"Field Paperwork Review"
by Scott Brady
Please Note: There is a fair amount of information in this document, covering things that need
to be documented as you proceed with your excavation work. However, DON'T PANIC
when reviewing this: There will always be a knowledgeable person from FOSA or the OSA to assist in getting the
form filled out completely and accurately, and most of it will become second nature as your level of
experience grows.

For most people, one of the least appealing aspects of participating in an archaeological excavation is the
completion of paperwork. However, the documentation of the excavation process is actually one of the most
critical aspects of the archaeological process. Archaeology, by its nature, is a destructive process.
The artifacts, features and soils can never be restored to their original condition after our excavations.
There is an adage that suggests "an archaeologist without proper documentation is just a well-intentioned
looter." While a little harsh, I do think it conveys the importance of properly documenting our
excavations in order to provide a complete understanding and data set for current and future site analysis.
While photography, soil sampling, profiling and numerous other techniques are used to collect important site
information, none is more basic, yet more critical, than the excavation level form, which is what will be
reviewed here.
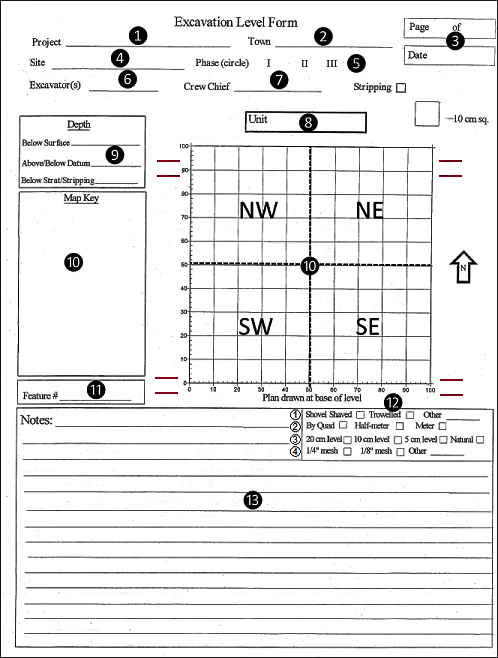
Front Side of Form

The excavation level form is a one page form (front and back) that is completed for each 1-meter x 1-meter
unit at specific depths, most commonly every 10 cm. While it can be intimidating for beginners it is relatively
straightforward. The following are the form fields:
❶ Project: The site name (i.e., Hollister, Templeton)
❷ Town
❸ Page and Date
❹ Site: The State Historic Preservation Office (SHPO) / Office of State
Archaeology (OSA) assigned site number. Format ###-##. The first three digits represent
the town where in which the site is located based on an alphabetical list of Connecticut's 169
municipalities. The second set of digits represents the number of the site within that
municipality. It should be noted that many archaeological sites have not been registered in the
SHPO/OSA inventory. The form and process for registering sites will be the subject of a future article.
❺ Phase: Circle the appropriate choice. For most FOSA projects this will
be Phase III.
Phase I = Walkover/Surface Collection;
Phase II = Test Pitting/Sampling;
Phase III = Full excavation.
❻ Excavator(s): Record the initials of the person(s) excavating the
unit. It is best to include the initial for your middle name, if you have one, as you'd be surprised how
many volunteers with the same first and last initials work on any given site.
❼ Crew Chief: For most FOSA activities, we will be excavating under
the direction of State Archaeologist Dr. Sarah Sportman, so "SS" will
most often be entered here.
❽ Unit: Enter the unit designation in the format
(N or S)# (E or W)#. All units on the site are designated by
their distance in meters from a randomly assigned datum along north-south and
east-west axis with the datum point being assigned N0E0.
❾ Depth: There are three options included in this section and all three
may be used. Complete all as required.
• Most commonly, the depth will be recorded on the "Below Surface" (bs)
line as the range of the last completed level (i.e., 0-10, 10-20, etc.).
• On some sites, especially those with significant elevation changes over the excavation
area, a datum will be established and a laser level will be used to record the distance
higher (above) or lower (below) than the datum location (e.g., 12-22 cm bd, 6-16 cm ad -
note that it is important to use the appropriate above datum (ad) or below datum (bd) notation
when recording this measurement).
• Less commonly, on some sites the depth may also be measured below a specific
soil strata or, if a specific depth of soil was stripped or removed mechanically prior to
excavations, the depth below the stripped soil will be measured and recorded.
Sample Grid
 ❿ The grid below is provided for the floor of the unit to be drawn.
• Make sure to orient the grid to the north before drawing. Draw
any artifacts, large stones or rocks, large roots, features and soil stains and record the location of
artifacts.
• Enter any symbols or abbreviations used in the "Map Key" section.
• The pair of maroon lines at each corner of the grid on the
front side of the form are used to record starting and ending depths at the indicated corner.
This is useful if a corner(s) of the unit are deeper than the level (perhaps due to the removal of a large
rock that left a depression or just due to some overzealous excavation) or if some object (i.e., artifact,
stone, bedrock outcropping) prevents excavation to the level depth.
Some examples are included below.
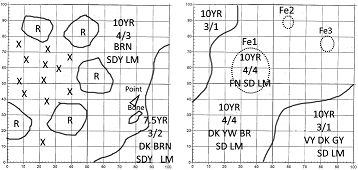
Left: A possible hearth with "R" designating rocks and "X" indicating charcoal flecks/concentrations.
The solid line across the lower right side of the grid indicates a change in soil color and the Munsell soil
designations for each soil color are included on the grid. If space is an issue, use a reference letter on
the grid and record the Munsell soil designations in the "Map Key" section.
Right: A dotted line can be used to indicate possible boundaries of soil texture changes or slight
color changes that do not differentiate in the Munsell system. In this example the dotted lines indicate
possible features where the soil is the same color as the surrounding matrix but has a texturally finer sand
component. This might be the case where posts were once placed.
 Feature: A feature is non-portable human
created/caused object like a hearth, wall or post. Features will be assigned a number based on the site's
feature list and should be recorded on this line as Fe#. Features should be drawn on the
grid and Munsell soil designations recorded on each level form. Feature: A feature is non-portable human
created/caused object like a hearth, wall or post. Features will be assigned a number based on the site's
feature list and should be recorded on this line as Fe#. Features should be drawn on the
grid and Munsell soil designations recorded on each level form.
 Several excavation parameters are recorded in this block... Several excavation parameters are recorded in this block...
① Line 1: Check the appropriate box for the
excavation method (Shovel Shaved, Troweled or Other) used on the
completed level. If more than one method was used check all that are applicable.
② Line 2: Check the appropriate box for any
sub-division being used within the excavation unit.
▸ Quadrant - The most common excavation method will divide the unit into four 50x50 cm quadrants
designated with the ordinal directions [i.e., northeast (NE), southeast (SE), southwest (SW), and northwest
(NW)]. Soil from each quadrant is excavated and screened separately from the remaining quadrants and any
artifacts recovered are recorded as originating in that quadrant.
▸ Half-meter - If excavating in two 50x100 cm half-meter blocks, soil will be excavated and screened
separately from the remaining block and any artifacts recovered will be recorded as originating in either the
north (NE & NW), south (SE & SW), east (NE & SE) or west (NW & SW) block.
▸ Meter - If excavating the entire meter, artifacts from the entire unit are collected and
recorded together.
③ Line 3: Check the box for the
appropriate depth of the completed level - 20 cm, 10 cm, 5 cm or Natural.
④ Line 4: Check the box for the appropriate
sifting screen mesh size - ¼", ⅛" or
Other. ¼" is often used on historic sites while
⅛" is preferred for contact and pre-contact period sites.
 Notes: This is, unfortunately, the most underutilized portion of the
excavation level form. The information provided in this section can be very important to teasing out details
regarding the formation, occupation and utilization of the site. Note any observations
that are not recorded elsewhere or any unusual conditions. Make a note if the unit was photographed at this
level. Some examples of possible comments: Notes: This is, unfortunately, the most underutilized portion of the
excavation level form. The information provided in this section can be very important to teasing out details
regarding the formation, occupation and utilization of the site. Note any observations
that are not recorded elsewhere or any unusual conditions. Make a note if the unit was photographed at this
level. Some examples of possible comments:
• Soil wetter this level.
• Nails concentrated in the eastern quadrants.
• Darker soil is more compacted then surrounding soils.
• Rocks and underlying soil slightly reddened - possible heat exposure.
• Nothing to draw.
• More charcoal flecking than previous level.
• Melted glass and heavy charcoal concentrations - possible evidence of fire.
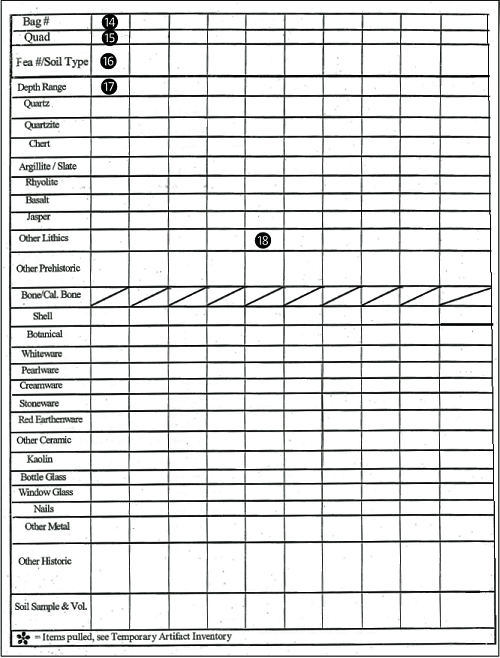
Back Side of Form
 The back side of the excavation level form is used to maintain an inventory of artifacts and other material
that is recovered from the unit during excavation of the level designated on the front of the form.
The back side of the excavation level form is used to maintain an inventory of artifacts and other material
that is recovered from the unit during excavation of the level designated on the front of the form.
 Bag #: Each unit will start numbering bags of
recovered artifacts with bag 1 and continue numerically. There will only be a single bag 1 for
any unit. When completing the form for the next depth level, numbering will continue consecutively from the
last number used on the previous form (i.e., last bag number on excavation level form for
0-10 cmbs is 4, first bag number on excavation level form for 10-20 cmbs will be 5). It can
also be helpful to note either here or in the notes section if there were quadrants where no artifacts were
recovered (i.e., SE Quad - No artifacts or SE and SW Quads - NCM (no cultural material)
. Bag numbers will be assigned as follows: Bag #: Each unit will start numbering bags of
recovered artifacts with bag 1 and continue numerically. There will only be a single bag 1 for
any unit. When completing the form for the next depth level, numbering will continue consecutively from the
last number used on the previous form (i.e., last bag number on excavation level form for
0-10 cmbs is 4, first bag number on excavation level form for 10-20 cmbs will be 5). It can
also be helpful to note either here or in the notes section if there were quadrants where no artifacts were
recovered (i.e., SE Quad - No artifacts or SE and SW Quads - NCM (no cultural material)
. Bag numbers will be assigned as follows:
• Each quadrant, half-block or meter will be assigned an individual bag number (i.e., if artifacts
were found in all four quadrants there will be four bag numbers assigned, if artifacts were found in both
half-blocks there will be two bag numbers assigned, if excavating by meter artifacts will be assigned one bag
number).
• Each feature where soil is screened separately and yields artifacts will be assigned an individual
bag number.
• Any unique artifact recovered will be assigned an individual bag number.
• Each soil sample collected will be assigned an individual bag number.
• Do not assign bag numbers for quadrants/half-blocks/meters where no artifacts are recovered. This
is very confusing and can result in wasted efforts to locate the "missing bag" when the artifacts are
processed in the lab and again when the artifacts are entered in the artifact database.
 Quad: Enter the following on this line: Quad: Enter the following on this line:
• If excavating by quadrant enter northeast (NE), southeast (SE), southwest (SW), or northwest (NW)
as applicable.
• If excavating by half-block enter north (NE & NW), south (SE & SW), or east (NE & SE) or west
(NW & SW) as applicable.
• If excavating by meter, enter All.
• If excavating by feature, enter all quadrants in which the feature is wholly or partially located.
 Fea# / Soil Type: Enter the feature number if the artifacts were
recovered in soil directly from that feature. Enter the soil type otherwise. The soil type is designated as
follows: Fea# / Soil Type: Enter the feature number if the artifacts were
recovered in soil directly from that feature. Enter the soil type otherwise. The soil type is designated as
follows:
• A - Topsoil is the surface soil including the organic
layer(s) in which plants have most of their roots and which are turned over by plowing. Usually, very dark
and with a high organic content. Effectively the entire state of Connecticut was at one time under plow or
otherwise had the topsoil disturbed by human activities so, with few exceptions, all topsoil will be
designated Ap (for soil layer A plowzone).
• B - Subsoil includes any layer(s) below the topsoil which
are composed of a lower percentage of organic material along with increased amounts of sand and silt. Usually,
much lighter in color than topsoil due to the decreased organic content. The first subsoil layer will be
designated B1 with additional layers numbered consecutively (i.e., B2).
• C - Glacial till includes any layer(s) below the subsoil
that were deposited by the last glacial retreat approximately 15,000 YBP. Usually, composed of coarser sands
with large cobbles and rocks and no organic content. The first glacial till layer will be designated
C1 with additional layers numbered consecutively (i.e., C2).
• ALV - Alluvial deposits include layer(s) deposited along a
river or stream by moving water, on a floodplain, shore or beach by flooding, waves or tidal action, or as an
alluvial fan at the base of a mountain, hill, or a steep walled gorge or canyon by runoff. The first alluvial
deposit layer will be designated ALV1 with additional layers numbered consecutively (i.e.,
ALV2).
• Fill - Fill deposits include layer(s) deposited in a cut
feature or depression by human activity. Often as an intentional action to fill a depression or dispose of
waste or unwanted material. The first fill deposit layer will be designated Fill1 with
additional layers numbered consecutively (i.e., Fill2).
 Depth Range: Generally recorded as
being the same depth range as in ❾ (i.e., 0-10, 10-20, etc.). If a unique artifact was
recovered at specific depth, or depth range, record that information here. Depth Range: Generally recorded as
being the same depth range as in ❾ (i.e., 0-10, 10-20, etc.). If a unique artifact was
recovered at specific depth, or depth range, record that information here.
 The remainder of the form is
used to record a quick field inventory of artifacts. As a general rule smaller assemblages of artifacts can
be counted and the quantities recorded in the appropriate box. When large assemblages of artifacts are
recovered it can be more expeditious to check off the appropriate artifact types after a quick review of the
assemblage without compiling artifact counts. The remainder of the form is
used to record a quick field inventory of artifacts. As a general rule smaller assemblages of artifacts can
be counted and the quantities recorded in the appropriate box. When large assemblages of artifacts are
recovered it can be more expeditious to check off the appropriate artifact types after a quick review of the
assemblage without compiling artifact counts.
Editor's Note: In case you were wondering how important
it is, doing all this as thoroughly as possible, we suggest you examine:
"Preliminary Analysis of Faunal Remains from the Hollister Site" by Sarah Sportman in the
Reprints section of this website. There is a good reason for doing it!

|
.")